Friday 31 July 2015

Android WebView

Android WebView is used to display web page in android. The web page can be loaded from same application or URL. It is used to display online content in android activity.

Android WebView uses webkit engine to display web page.

Sample Code:

File: activity_main.xml

<RelativeLayout xmlns:android="http://schemas.android.com/apk/res/android"
    xmlns:tools="http://schemas.android.com/tools"
    android:layout_width="match_parent"
    android:layout_height="match_parent"
    tools:context=".MainActivity" >

    <WebView
        android:id="@+id/webView1"
        android:layout_width="match_parent"
        android:layout_height="match_parent"
        android:layout_alignParentTop="true"
        android:layout_centerHorizontal="true"/>

</RelativeLayout>

File: MainActivity.java

package com.sneha.webview;

import android.os.Bundle;
import android.app.Activity;
import android.webkit.WebView;

public class MainActivity extends Activity
{
@Override
protected void onCreate(Bundle savedInstanceState)
{
super.onCreate(savedInstanceState);
setContentView(R.layout.activity_main);

WebView mywebview = (WebView) findViewById(R.id.webView1);
mywebview.loadUrl("http://www.javatpoint.com/");
}
}

Output:


Download Full Source Code: Webview

Enjoy Coding...!!!

Android AutoCompleteTextView

Android AutoCompleteTextView completes the word based on the reserved words, so no need to write all the characters of the word.

Android AutoCompleteTextView is a editable text field, it displays a list of suggestions in a drop down menu from which user can select only one suggestion or value.


Android AutoCompleteTextView is the subclass of EditText class. The MultiAutoCompleteTextView is the subclass of AutoCompleteTextView class.

Sample Code:

File: activity_main.xml

<RelativeLayout xmlns:android="http://schemas.android.com/apk/res/android"
    xmlns:tools="http://schemas.android.com/tools"
    android:layout_width="match_parent"
    android:layout_height="match_parent"
    tools:context=".MainActivity"
    android:background="@drawable/bg">

    <TextView
        android:id="@+id/textView1"
        android:layout_width="wrap_content"
        android:layout_height="wrap_content"
        android:layout_alignParentTop="true"
        android:layout_centerHorizontal="true"
        android:layout_marginTop="17dp"
        android:text="@string/what_is_your_favourite_programming_language_"
        android:textColor="#FB3434"
        android:textStyle="bold"/>
 
    <AutoCompleteTextView
        android:id="@+id/autoCompleteTextView1"
        android:layout_width="wrap_content"
        android:layout_height="wrap_content"
        android:layout_alignParentLeft="true"
        android:layout_below="@+id/textView1"
        android:layout_marginLeft="36dp"
        android:layout_marginTop="17dp"
        android:ems="10"
        android:text="">

        <requestFocus />
    </AutoCompleteTextView>
</RelativeLayout>

File: MainActivity.java

package com.sneha.autocompletetextview;

import android.os.Bundle;
import android.app.Activity;
import android.graphics.Color;
import android.view.Menu;
import android.widget.ArrayAdapter;
import android.widget.AutoCompleteTextView;

public class MainActivity extends Activity
{
String[] language ={"Arabic","Albanian","Afrikaans","Basque","Bengali","Catalan","Chinese",
"Danish","Dutch","English","Estonian","French","Gujarati","Greek","German","Hindi",
"Hausa","Italic","Irish","Japanese","Kannada","Kazakh","Lao","Latin","Malay","Marathi",
"Nepali","Polish","Punjabi","Russian","Spanish","Swedish","Tamil","Telugu","Thai",
"Urdu"};

@Override
protected void onCreate(Bundle savedInstanceState)
{
super.onCreate(savedInstanceState);
setContentView(R.layout.activity_main);

ArrayAdapter<String> adapter = new ArrayAdapter<String> (this, android.R.layout.select_dialog_item,language);

AutoCompleteTextView actv = (AutoCompleteTextView) findViewById (R.id.autoCompleteTextView1);

actv.setThreshold(1);
actv.setAdapter(adapter);
actv.setTextColor(Color.RED);        
}

@Override
public boolean onCreateOptionsMenu(Menu menu)
{
// Inflate the menu; this adds items to the action bar if it is present.
getMenuInflater().inflate(R.menu.activity_main, menu);
return true;
}
}

Output: 


Download Full Source Code: AutoCompleteTextView

Enjoy Coding...!!!

Android Cards List View

Hello Friends,

You can create stylish listview in android. Card Style Listview is one of them. This is to help achieve a specific styling.

Card Listview is a new concept. This kind of listview is used to display multiple items like card style.

You can refer following sample code for implement it in your android application.

Sample Code:

File: listview.xml

<?xml version="1.0" encoding="utf-8"?>

<LinearLayout
xmlns:android="http://schemas.android.com/apk/res/android"
android:orientation="vertical"
android:layout_width="match_parent"
android:layout_height="wrap_content"
android:background="#e2e4fe">

<ListView
android:id="@+id/card_listView"
android:layout_width="match_parent"
android:layout_height="wrap_content"
android:listSelector="@android:color/transparent"
android:cacheColorHint="@android:color/transparent"
android:divider="@null"
android:dividerHeight="10dp" />
</LinearLayout>

File: list_item_card.xml

<?xml version="1.0" encoding="utf-8"?>
<FrameLayout
xmlns:android="http://schemas.android.com/apk/res/android"
android:layout_width="match_parent"
android:layout_height="wrap_content"
android:paddingLeft="15dp"
android:paddingRight="15dp"
android:descendantFocusability="beforeDescendants">

<LinearLayout
android:orientation="vertical"
android:layout_width="match_parent"
android:layout_height="wrap_content"
android:paddingLeft="15dp"
android:paddingTop="15dp"
android:paddingBottom="15dp"
android:paddingRight="15dp"
android:background="@drawable/card_background_selector"
android:descendantFocusability="afterDescendants">

<TextView
android:id="@+id/line1"
android:layout_width="wrap_content"
android:layout_height="wrap_content"
android:text="Text line 1"
android:textColor="#FF8000"/>

<TextView
android:id="@+id/line2"
android:layout_width="wrap_content"
android:layout_height="wrap_content"
android:text="Text line 2"
android:textColor="#FF8000"/>

</LinearLayout>
</FrameLayout>

File: CardListActivity.java

package com.sneha.cardslistview;

import android.app.Activity;
import android.os.Bundle;
import android.view.View;
import android.widget.ListView;

public class CardListActivity extends Activity
{
    private static final String TAG = "CardListActivity";
    private CardArrayAdapter cardArrayAdapter;
    private ListView listView;

    @Override
    public void onCreate(Bundle savedInstanceState)
    {
        super.onCreate(savedInstanceState);
        setContentView(R.layout.listview);
        listView = (ListView) findViewById(R.id.card_listView);

        listView.addHeaderView(new View(this));
        listView.addFooterView(new View(this));

        cardArrayAdapter = new CardArrayAdapter(getApplicationContext(), R.layout.list_item_card);

        for (int i = 0; i < 10; i++)
        {
            Card card = new Card("Card " + (i+1) + " Line 1", "Card " + (i+1) + " Line 2");
            cardArrayAdapter.add(card);
        }
        listView.setAdapter(cardArrayAdapter);
    }
}

File: CardArrayAdapter.java

package com.sneha.cardslistview;

import android.content.Context;
import android.graphics.Bitmap;
import android.graphics.BitmapFactory;
import android.view.LayoutInflater;
import android.view.View;
import android.view.ViewGroup;
import android.widget.ArrayAdapter;
import android.widget.TextView;
import java.util.ArrayList;
import java.util.List;

public class CardArrayAdapter extends ArrayAdapter<Card>
{
    private static final String TAG = "CardArrayAdapter";
    private List<Card> cardList = new ArrayList<Card>();

    static class CardViewHolder
    {
        TextView line1;
        TextView line2;
    }

    public CardArrayAdapter(Context context, int textViewResourceId)
    {
        super(context, textViewResourceId);
    }

    @Override
    public void add(Card object)
    {
        cardList.add(object);
        super.add(object);
    }

    @Override
    public int getCount()
    {
        return this.cardList.size();
    }

    @Override
    public Card getItem(int index)
    {
        return this.cardList.get(index);
    }

    @Override
    public View getView(int position, View convertView, ViewGroup parent)
    {
        View row = convertView;
        CardViewHolder viewHolder;
     
        if (row == null)
        {
            LayoutInflater inflater = (LayoutInflater) this.getContext().getSystemService(Context.LAYOUT_INFLATER_SERVICE);
            row = inflater.inflate(R.layout.list_item_card, parent, false);
            viewHolder = new CardViewHolder();
            viewHolder.line1 = (TextView) row.findViewById(R.id.line1);
            viewHolder.line2 = (TextView) row.findViewById(R.id.line2);
            row.setTag(viewHolder);
        }
        else
        {
            viewHolder = (CardViewHolder)row.getTag();
        }
        Card card = getItem(position);
        viewHolder.line1.setText(card.getLine1());
        viewHolder.line2.setText(card.getLine2());
        return row;
    }

    public Bitmap decodeToBitmap(byte[] decodedByte)
    {
        return BitmapFactory.decodeByteArray(decodedByte, 0, decodedByte.length);
    }
}

File: Card.java

package com.sneha.cardslistview;

public class Card
{
    private String line1;
    private String line2;

    public Card(String line1, String line2)
    {
        this.line1 = line1;
        this.line2 = line2;
    }

    public String getLine1()
    {
        return line1;
    }

    public String getLine2()
    {
        return line2;
    }
}

Output:


Download Full Source Code: CardListView

Enjoy Coding...!!!

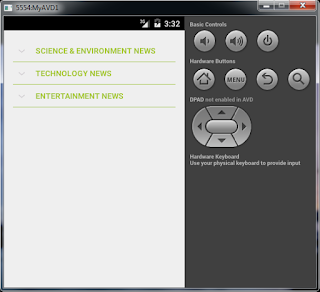
Expandable Listview in Android


ExpandableListView is an Android container available as part of the platform. It will be useful to display grouped set of items. On click of the group titles the child elements will be expanded.

Sample Code:

File: activity_main.xml

<RelativeLayout xmlns:android="http://schemas.android.com/apk/res/android"    xmlns:tools="http://schemas.android.com/tools"    android:layout_width="match_parent"    android:layout_height="match_parent"    android:paddingLeft="@dimen/activity_horizontal_margin"    android:paddingRight="@dimen/activity_horizontal_margin"    android:paddingTop="@dimen/activity_vertical_margin"    android:paddingBottom="@dimen/activity_vertical_margin"    tools:context="com.javapapers.android.expandablelistview.app.MainActivity">

    <ExpandableListView        android:id="@+id/expandableListView"        android:layout_height="match_parent"        android:layout_width="match_parent"        android:indicatorLeft="?android:attr/expandableListPreferredItemIndicatorLeft"        android:divider="#A4C739"        android:dividerHeight="0.5dp" />

</RelativeLayout>

File: list_group.xml

<?xml version="1.0" encoding="utf-8"?>

<LinearLayout xmlns:android="http://schemas.android.com/apk/res/android"
    android:orientation="vertical" android:layout_width="match_parent"
    android:layout_height="match_parent">

    <TextView
        android:id="@+id/listTitle"
        android:layout_width="fill_parent"
        android:layout_height="wrap_content"
        android:paddingLeft="?android:attr/expandableListPreferredItemPaddingLeft"
        android:textColor="#A4C739"
        android:paddingTop="10dp"
        android:paddingBottom="10dp" />


</LinearLayout>

File: list_item.xml

<?xml version="1.0" encoding="utf-8"?>

<LinearLayout xmlns:android="http://schemas.android.com/apk/res/android"
    android:orientation="vertical" android:layout_width="match_parent"
    android:layout_height="wrap_content">
    <TextView
        android:id="@+id/expandedListItem"
        android:layout_width="fill_parent"
        android:layout_height="wrap_content"
        android:paddingLeft="?android:attr/expandableListPreferredChildPaddingLeft"
        android:paddingTop="10dp"
        android:paddingBottom="10dp" />
</LinearLayout>

File: MainActivity.java

package com.sneha.expandablelistview;

import java.util.ArrayList;
import java.util.HashMap;
import java.util.List;
import android.app.Activity;
import android.os.Bundle;
import android.view.View;
import android.widget.ExpandableListView;
import android.widget.ExpandableListView.OnChildClickListener;
import android.widget.ExpandableListView.OnGroupCollapseListener;
import android.widget.ExpandableListView.OnGroupExpandListener;
import android.widget.Toast;

public class MainActivity extends Activity
{
    ExpandableListView expandableListView;
    ExpandableListAdapter expandableListAdapter;
    List<String> expandableListTitle;
    HashMap<String, List<String>> expandableListDetail;

    @Override
    protected void onCreate(Bundle savedInstanceState)
    {
        super.onCreate(savedInstanceState);
        setContentView(R.layout.activity_main);
        expandableListView = (ExpandableListView) findViewById(R.id.expandableListView);
        expandableListDetail = ExpandableListDataPump.getData();
        expandableListTitle = new ArrayList<String>(expandableListDetail.keySet());
        expandableListAdapter = new ExpandableListAdapter(this, expandableListTitle, expandableListDetail);
        expandableListView.setAdapter(expandableListAdapter);
        expandableListView.setOnGroupExpandListener(new OnGroupExpandListener()
        {
            @Override
            public void onGroupExpand(int groupPosition)
            {
                Toast.makeText(getApplicationContext(), expandableListTitle.get(groupPosition) + " List Expanded.", Toast.LENGTH_SHORT).show();
            }
        });

        expandableListView.setOnGroupCollapseListener(new OnGroupCollapseListener()
        {
            @Override
            public void onGroupCollapse(int groupPosition)
            {
                Toast.makeText(getApplicationContext(), expandableListTitle.get(groupPosition) + " List Collapsed.", Toast.LENGTH_SHORT).show();
            }
        });

        expandableListView.setOnChildClickListener(new OnChildClickListener()
        {
            @Override
            public boolean onChildClick(ExpandableListView parent, View v, int groupPosition, int childPosition, long id)
            {
                Toast.makeText(getApplicationContext(), expandableListTitle.get(groupPosition)
                                + " -> " + expandableListDetail.get(expandableListTitle.get(groupPosition)).
                                get(childPosition), Toast.LENGTH_SHORT).show();
                return false;
            }
        });
    }
}

File: ExpandableListAdapter.java

package com.sneha.expandablelistview;

import java.util.HashMap;
import java.util.List;
import android.content.Context;
import android.graphics.Typeface;
import android.view.LayoutInflater;
import android.view.View;
import android.view.ViewGroup;
import android.widget.BaseExpandableListAdapter;
import android.widget.TextView;

public class ExpandableListAdapter extends BaseExpandableListAdapter
{
    private Context context;
    private List<String> expandableListTitle;
    private HashMap<String, List<String>> expandableListDetail;

    public ExpandableListAdapter(Context context, List<String> expandableListTitle, HashMap<String, List<String>> expandableListDetail)
    {
        this.context = context;
        this.expandableListTitle = expandableListTitle;
        this.expandableListDetail = expandableListDetail;
    }

    @Override
    public Object getChild(int listPosition, int expandedListPosition)
    {
        return this.expandableListDetail.get(this.expandableListTitle.get(listPosition)).get(expandedListPosition);
    }

    @Override
    public long getChildId(int listPosition, int expandedListPosition)
    {
        return expandedListPosition;
    }

    @Override
    public View getChildView(int listPosition, final int expandedListPosition, boolean isLastChild, View convertView, ViewGroup parent)
    {
        final String expandedListText = (String) getChild(listPosition, expandedListPosition);
     
        if (convertView == null)
        {
            LayoutInflater layoutInflater = (LayoutInflater) this.context.getSystemService(Context.LAYOUT_INFLATER_SERVICE);
            convertView = layoutInflater.inflate(R.layout.list_item, null);
        }
        TextView expandedListTextView = (TextView) convertView.findViewById(R.id.expandedListItem);
        expandedListTextView.setText(expandedListText);
        return convertView;
    }

    @Override
    public int getChildrenCount(int listPosition)
    {
        return this.expandableListDetail.get(this.expandableListTitle.get(listPosition)).size();
    }

    @Override
    public Object getGroup(int listPosition)
    {
        return this.expandableListTitle.get(listPosition);
    }

    @Override
    public int getGroupCount()
    {
        return this.expandableListTitle.size();
    }

    @Override
    public long getGroupId(int listPosition)
    {
        return listPosition;
    }

    @Override
    public View getGroupView(int listPosition, boolean isExpanded, View convertView, ViewGroup parent)
    {
        String listTitle = (String) getGroup(listPosition);
     
        if (convertView == null)
        {
            LayoutInflater layoutInflater = (LayoutInflater) this.context.getSystemService(Context.LAYOUT_INFLATER_SERVICE);
            convertView = layoutInflater.inflate(R.layout.list_group, null);
        }
        TextView listTitleTextView = (TextView) convertView.findViewById(R.id.listTitle);
        listTitleTextView.setTypeface(null, Typeface.BOLD);
        listTitleTextView.setText(listTitle);
        return convertView;
    }

    @Override
    public boolean hasStableIds()
    {
        return false;
    }

    @Override
    public boolean isChildSelectable(int listPosition, int expandedListPosition)
    {
        return true;
    }
}

Output:


Download Full Source CodeExpandableListview

Enjoy Coding...!!!

Android Date and Time Picker

Today I am going to explain Date and Time Picker in android.

In many applications you require to set date and time feature. Its very simple to implement in android.

Android provide default Date and Time picker widget. You just use it in xml and do the pre-define code for display it.

Sample Code:

1) For Date Picker:

File: MainActivity.java

 public void populateSetDate(int year, int month, int day)
 {
    mEdit = (EditText)findViewById(R.id.editText1);
    mEdit.setText(month+"/"+day+"/"+year);
 }

 public class SelectDateFragment extends DialogFragment implements  DatePickerDialog.OnDateSetListener
 {
    @Override
    public Dialog onCreateDialog(Bundle savedInstanceState)
    {
final Calendar calendar = Calendar.getInstance();
int yy = calendar.get(Calendar.YEAR);
int mm = calendar.get(Calendar.MONTH);
int dd = calendar.get(Calendar.DAY_OF_MONTH);
return new DatePickerDialog(getActivity(), this, yy, mm, dd);
    }
   
    public void onDateSet(DatePicker view, int yy, int mm, int dd)
    {
    populateSetDate(yy, mm+1, dd);
    }
 }

Output:


Download Full Source Code: DatePicker

2) For Time Picker:

File: MainActivity.java

@Override
protected Dialog onCreateDialog(int id)
{
switch (id)
{
         case TIME_DIALOG_ID:
// set time picker as current time
return new TimePickerDialog(this, timePickerListener, hour, minute,false);
}
return null;
}

private TimePickerDialog.OnTimeSetListener timePickerListener =  new TimePickerDialog.OnTimeSetListener()
{
public void onTimeSet(TimePicker view, int selectedHour, int selectedMinute)
{
hour = selectedHour;
minute = selectedMinute;

// set current time into textview
textViewTime.setText(new  StringBuilder().append(padding_str(hour))..append(":")                              .append(padding_str(minute)));

// set current time into timepicker
timePicker.setCurrentHour(hour);
timePicker.setCurrentMinute(minute);

}
};

private static String padding_str(int c)
{
if (c >= 10)
            return String.valueOf(c);
else
            return "0" + String.valueOf(c);
}

Output:


Download Full Source Code: TimePicker

Enjoy with coding...!!!

Gridview in Android

Gridview is ViewGroup that displays items in two-dimensional, scrollable grid. The grid items are automatically inserted to the layout using ListAdapter.

In a simple meaning you can display items with grid. So your all items looks like same in your layout.

Here I display multiple images in GridView. When you click on any image it will display as a large image into Imageview.

So you can learn two things using this post. First is use of gridview and second is display selected item in other activity. 

Sample Code:

File: grid_layout.xml

<?xml version="1.0" encoding="utf-8"?>
<GridView xmlns:android="http://schemas.android.com/apk/res/android"
    android:id="@+id/grid_view"
    android:layout_width="fill_parent"
    android:layout_height="fill_parent"
    android:numColumns="auto_fit"
    android:columnWidth="90dp"
    android:horizontalSpacing="10dp"
    android:verticalSpacing="10dp"
    android:gravity="center"
    android:stretchMode="columnWidth" >  


</GridView>

File: AndroidGridLayoutActivity.java

GridView gridView = (GridView) findViewById(R.id.grid_view);

// Instance of ImageAdapter Class
gridView.setAdapter(new ImageAdapter(this));

/**
 * On Click event for Single Gridview Item
 * */
gridView.setOnItemClickListener(new OnItemClickListener() 
{
       @Override
public void onItemClick(AdapterView<?> parent, View v, int position, long id) 
{
// Sending image id to FullScreenActivity
Intent i = new Intent(getApplicationContext(), FullImageActivity.class);
// passing array index
i.putExtra("id", position);
startActivity(i);
}

});

Output:


Download Source Code : AndroidGridviewLayout

Happy Coding...:-)

Friday 24 July 2015

Listview In Android

Hello Friends,

In Android there are many types of listview available. Here I presented all major types of listview example with this post.

Types of Listview I include in this examples are:

1) Simple Listview : 
--> In this type you can see simple list of items with auto scrolling.

2) Listview with single choice :
--> When you use single choice in listview then you can see the items with radio button. You can select only one option from list and do the further use in your app.

3) Listview with multiple choice : 
--> When you use multiple choice in listview then you can see the items with check box. You can select multiple items from the list and do the further use in your app.

4) Filterable Listview : 
--> In filterable listview you can filter items which are start on same letter then select any one of them with simple click.

5) Listview with Images and Text : 
--> Here you can display images and its relevant text into listview.

6) Dynamically add items into listview : 
--> If you don't want to use fix item into listview then you can add your own items dynamically into listview using this option.

7) Delete selected items from listview : 
--> If you want to remove some items from listview then its easy to do it with this option.

For more details see the screen shots and demo code.

Output:


Download full source code from here. ListviewDemo

Happy Coding...!!!

Internet Connection Checking In Android

Hello Guys, Here I am going to explain check Internet Connection using your android application.

In many application you need to check this functionality to display other features of your application.

It's very simple to check your internet is connected or not.

You can use simple code.

Step 1: Add Internet and Access Network Permission in your manifest file.

    <uses-permission android:name="android.permission.INTERNET"/>
    <uses-permission android:name="android.permission.ACCESS_NETWORK_STATE"/>

Step 2: Sample code

File: activity_internet_availability.xml

<LinearLayout xmlns:android="http://schemas.android.com/apk/res/android"
    android:layout_width="fill_parent"
    android:layout_height="fill_parent"
    android:orientation="vertical"
    android:background="@drawable/main_bg"
    android:gravity="center">

    <Button
        android:id="@+id/btn_internet"
        android:layout_width="280dp"
        android:layout_height="50dp"
        android:text="Check Internet Connectivity"
        android:layout_gravity="center"
        android:textStyle="bold"
        android:typeface="serif"
        android:paddingLeft="8dp"
        android:paddingRight="8dp"
        android:background="@drawable/yellow_button"/>

</LinearLayout>

File: MyUtility

public class MyUtility
{
public boolean isInternetAvailable(Context context)
{
 ConnectivityManager cm = (ConnectivityManager)                                                 context.getSystemService(Context.CONNECTIVITY_SERVICE);
 NetworkInfo netInfo = cm.getActiveNetworkInfo();

 if (netInfo != null && netInfo.isConnectedOrConnecting())
 {
 return true;
 }
 return false;
}
}

Output:


Download full source code from here. InternetConnection

Happy Coding...!!!

Call In Android

Today I am going to explain how to do call using android.

For call using your android application you need to give the permission like following in your Manifest file.

Permission: <uses-permission android:name="android.permission.CALL_PHONE" />

Sample Code:

String url = "tel:07969999999";

startActivity(new Intent(Intent.ACTION_CALL, Uri.parse(url)));


Download Full Source Code: DirectCall

Enjoy Coding...!!!

Thursday 23 July 2015

Send An Email In Android

Here I am going to explain how to send email using android.

For email sending you must need an Internet permission in your application. You can send an email via Share Intent.

You can write permission like: <uses-permission android:name="android.permission.INTERNET"/>

For Example:

String to = "";
String subject = "My Message";
Intent email = new Intent(Intent.ACTION_SEND);
email.putExtra(Intent.EXTRA_EMAIL, new String[]{ to});
email.putExtra(Intent.EXTRA_SUBJECT, subject);
email.putExtra(Intent.EXTRA_TEXT, et_message.getText().toString().trim());
 
//need this to prompts email client only
email.setType("message/rfc822");
 
startActivity(Intent.createChooser(email, "Choose an Email Client :"));

This code is send a request to your email composer for send an email.

Email Intent have some more options like following. You can use it according to your requirement.

  • EXTRA_BCCemail addresses for blind carbon copy
  • EXTRA_CCemail addresses for carbon copy
  • EXTRA_EMAILemail addresses for recipients
  • EXTRA_HTML_TEXTSupply an alternative to EXTRA_TEXT as HTML formatted text
  • EXTRA_STREAMURI holding a stream of data supplying the data that are sent
  • EXTRA_SUBJECTThe subject of an email
  • EXTRA_TEXTThe message body of the email 
  • EXTRA_TITLEThe title that is shown when the user has to choose an email client.
Output:


You can download the full source code from here. SendEmail

Enjoy Coding...!!!

Friday 17 July 2015

Custom Dialog In Android

Hello friends, In last post we have seen how to create alert dialog. Alert dialog is a default functionality in Android.

If you want to create your own dialog then what to do...??????

Let's start to create Custom Dialog in Android.

In this example i applied screen's background and Button with background, its border. So you can learn to customize button also.

Same like you can create a design for header, footer and any components according to your project.

Step 1: You need to create your own design for dialog.

Here I provide you sample code.

File : activity_custom_alert_dialog.xml

<LinearLayout xmlns:android="http://schemas.android.com/apk/res/android"
    android:layout_width="fill_parent"
    android:layout_height="fill_parent"
    android:orientation="vertical"
    android:background="@drawable/mainbg">

    <Button
        android:id="@+id/btn_click"
        android:layout_width="250dp"
        android:layout_height="45dp"
        android:text="Click Me"
        android:layout_gravity="center"
        android:paddingLeft="10dp"
        android:paddingRight="10dp"
        android:layout_marginTop="20dp"
        android:typeface="serif"
        android:textStyle="bold"
        android:background="@drawable/btnbg"/>

</LinearLayout>

Step 2: Do the java code into your activity file.

File : CustomAlertDialog.java

protected void showCustomDialog() {
cad_dialog = new Dialog(CustomAlertDialog.this,android.R.style.Theme_Translucent);
cad_dialog.requestWindowFeature(Window.FEATURE_NO_TITLE);

cad_dialog.setCancelable(true);
cad_dialog.setContentView(R.layout.customdialog);

edt_feedback = (EditText) cad_dialog.findViewById(R.id.etfeedback);
btn_ok = (Button) cad_dialog.findViewById(R.id.btnok);
btn_cancel = (Button) cad_dialog.findViewById(R.id.btncancel);

cad_dialog.show();

btn_ok.setOnClickListener(new OnClickListener()
{
@Override
public void onClick(View v)
{
// TODO Auto-generated method stub
Toast.makeText(getApplicationContext(), "You have clicked OK...!!!",                                                 Toast.LENGTH_LONG).show();
cad_dialog.dismiss(); // Here you can perform any action as per your requirement.
}
});

btn_cancel.setOnClickListener(new OnClickListener()
{
@Override
public void onClick(View v)
{
// TODO Auto-generated method stub
cad_dialog.dismiss();
}
});

}

Step 3: Output


You can download full source code from here. CustomAlertDialog.zip

Enjoy Coding...!!!